
Pruning
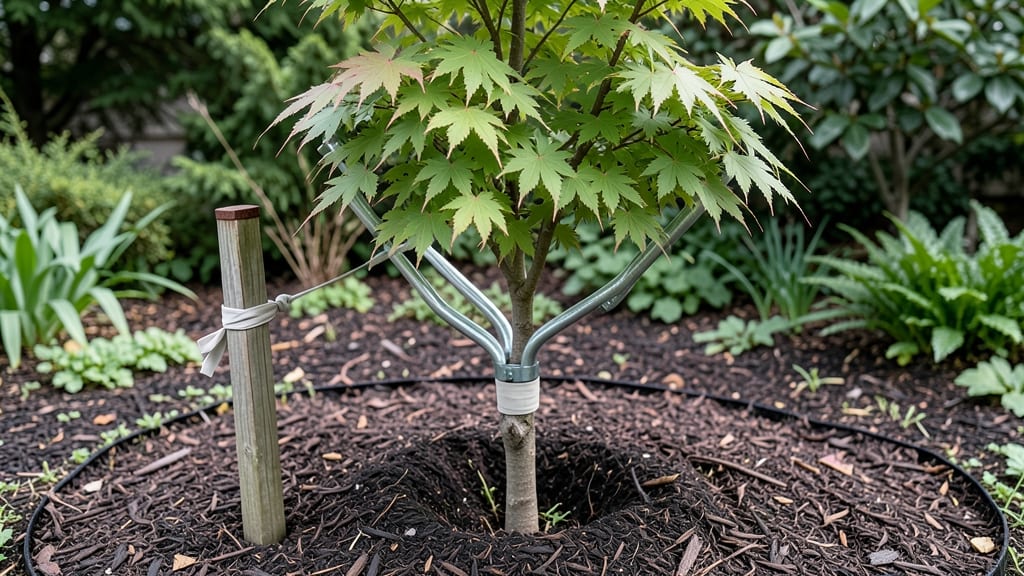
Young trees need sturdy support to grow straight and strong—tree brace supports are the secret weapon against wind, storms, and weak stems. 🌳 I learned the hard way when my first sapling leaned so far it nearly snapped in a spring storm; now I never skip this step for trees under 10 feet tall or in exposed areas.
The right materials make all the difference: tree ties (not wire—they cut into bark), sturdy wooden stakes, or spiral supports that let the trunk grow naturally. You’ll want at least two stakes per tree, positioned 18-24 inches from the trunk to prevent girdling, with the brace snug but not crushing.
When installed correctly, these supports let your tree develop strong structural wood while protecting it from damage. The key is checking them every 6-12 months—loosen ties as the trunk thickens, replace broken stakes, and watch for signs of rubbing or constriction.
Even with supports, young trees need proper watering and mulching. Think of the brace as a temporary training wheel—remove it when the tree can stand on its own (usually 3-5 years for most species). Your future shade tree will thank you.
📚 In This Guide
- What you need
- Instructions
- Tips and common mistakes
- Wrapping up and next steps
What you need
- ● Tree brace support kit (or DIY materials: 2-3 2x4 lumber or galvanized steel pipes, 1-2 inches in diameter)
- ● Stakes (3-4 wooden or metal stakes, 1-2 inches in diameter, 3-4 feet long)
- ● Ties (4-6 tree tie straps or rubber tree straps, 1-2 inches wide)
- ● Measuring tape (for precision)
- ● Shovel (for digging holes)
- ● Hammer or mallet (if using wooden stakes)
- ● Adjustable wrench (if using metal pipes)
- ● Protective gloves (for safety)
- ● Tree guard or wrap (to protect the trunk from rubbing)
- ● Concrete mix (for securing stakes in place)
- ● Level (to ensure stakes are straight)
- ● Saw (if cutting lumber to size)
Step-by-Step guide to installing tree brace supports
Here's how I stabilize young trees for strong, wind-resistant growth—no guesswork, just proven techniques.
🪴 Step 1: Assess Tree Trunk and Choose Brace Type
Examine the tree trunk for flexibility—press gently at the base. If it bends more than 10 degrees under light pressure, it needs immediate support. For trees under 4 inches in diameter, use flexible plastic or metal braces that allow natural movement. Thicker trunks (4-6 inches) require sturdy metal or wooden supports with adjustable straps.
I always check root flare first—if roots are buried too deep, they won't anchor properly. Loosen soil around the flare with a hand trowel before installing any brace. This prevents girdling as the tree grows. For windy areas, opt for three-point support systems (one brace at the base, two at 1/3 height) rather than single-point braces that create weak leverage points.
✂️ Step 2: Install Anchors and Position Brace Correctly
Drive T-post anchors into the ground at a 45-degree angle, 12-18 inches from the trunk—far enough to avoid root damage but close enough to prevent leverage. Use a level tool to ensure anchors are perfectly vertical before securing. For clay soil, pre-drill holes with a 1-inch auger to prevent cracking during installation.
Position the brace 2-3 inches above ground level—never at the base where moisture collects. Wrap the strap snugly but not tight; you should be able to fit 1 finger between the brace and trunk. Over-tightening restricts growth and can create pressure points that split bark as the tree expands. I always mark the brace with a permanent marker at installation to monitor trunk expansion later.
🌿 Step 3: Secure the Brace and Test Stability
Tighten the brace strap in three incremental steps, checking after each adjustment. First, snug enough to prevent sway; second, firm enough to resist 10 mph wind; third, final tension that allows no visible movement when pushed gently. For metal braces, use stainless steel hardware to prevent rust that can weaken the system over time.
Test stability by applying 5-10 pounds of downward pressure at the top of the tree. If the trunk bends but doesn't snap back immediately, the brace needs adjustment. I recommend checking tension every 2-3 weeks during the first growing season—wooden braces stretch slightly under moisture changes, while metal stays rigid. Adjust as needed to maintain that 1-finger gap between brace and trunk.
⏰ Step 4: Monitor Growth and Adjust as Needed
After 6 months, remove and reapply the brace if the trunk has grown beyond the original strap length. I use a measuring tape to track circumference growth—if the brace is more than 1 inch too small, it's time to upgrade to a larger size. Never leave a brace on permanently; the goal is to train the tree's natural strength, not create dependency.
Watch for signs of stress: yellowing leaves above the brace indicate restricted water flow, while bark splitting means the brace was too tight. If you see either, loosen immediately and consider switching to a flexible fabric wrap for the next season. Most trees outgrow their need for braces by 3-5 years**, but some species (like willows) may require support for a decade.
Tips & tricks for perfect tree brace installation
These proven techniques will help you avoid common mistakes and ensure your young trees grow strong and resilient.
Flexibility Test: When assessing trunk flexibility in Step 1, press firmly but gently—you're testing natural bend, not strength. A trunk that bends more than 10 degrees under light pressure needs immediate support, especially in wind-prone areas. I've seen many gardeners overlook this test and later deal with snapped trunks during storms. For young trees, even a slight bend indicates they need the three-point support system mentioned in Step 1.
Anchor Placement Strategy: The 45-degree angle for T-post anchors in Step 2 isn't arbitrary—it creates optimal leverage while preventing soil erosion. For clay soil, pre-drilling holes with a 1-inch auger prevents cracking that can compromise anchor stability. I recommend using a rubber mallet for the final insertion to avoid damaging anchor threads. Position anchors just beyond the tree's root flare to prevent future girdling as the trunk expands.
Brace Positioning: The 2-3 inch height above ground level in Step 2 is critical—this prevents moisture buildup at the brace-trunk interface, which can cause rot. When wrapping the strap, visualize the tree's growth pattern: the brace should accommodate at least 1 inch of trunk expansion before needing adjustment. I always mark the initial circumference with a permanent marker to track growth progress over the 6-month period mentioned in Step 4.
Material Selection: For metal braces, stainless steel hardware is worth the investment—it prevents rust that can weaken the system over time. Wooden braces require more frequent tension checks (every 2-3 weeks) due to their natural expansion/contraction with moisture changes. I've found that flexible fabric wraps work well for trees requiring temporary support during the growing season, particularly when bark splitting becomes a concern.
Pro Tips for Tree Brace Support
- These proven techniques will help you avoid common mistakes and ensure your young trees grow strong and resilient.
- Flexibility Test: When assessing trunk flexibility in Step 1, press firmly but gently—you're testing natural bend, no...
- Anchor Placement Strategy: The 45-degree angle for T-post anchors in Step 2 isn't arbitrary—it creates optimal levera...
Frequently asked questions
When is the best time to install tree brace support?
The ideal time is immediately after planting or when a tree shows signs of instability (e.g., leaning, cracked trunk, or excessive swaying). For newly planted trees, install braces within the first 6–12 months to prevent wind damage. Avoid installing during extreme weather or when the soil is frozen.
How long should tree brace support stay on?
Most braces should remain for 2–5 years, depending on the tree’s growth and stability. Remove them once the trunk thickens enough to support itself (typically when the diameter reaches 2–3 inches). Over-leaving braces can weaken the tree by restricting natural movement.
Are DIY tree brace supports cheaper than professional installation?
Yes! DIY kits (like tree straps or cable systems) cost $20–$100, while professional installation can run $100–$500+. However, DIY requires precision—measure twice and follow guidelines to avoid damage. For large or valuable trees, hiring an arborist ensures proper fit and longevity.
What do I do if my tree brace is digging into the trunk?
Adjust the brace immediately—a tight or improperly fitted brace can girdle the trunk and restrict growth. Loosen straps, reposition cables, or add padding (like tree-friendly foam) between the brace and bark. If damage occurs, trim the affected area carefully (sterilize tools!) and monitor for healing.
Can I use tree brace support on mature trees?
Braces are primarily for young/sapling trees, but they can help mature trees with storm damage or structural weaknesses. For older trees, consult an arborist first—alternatives like cabling or guying may be more effective. Never use braces on trees with rot, disease, or severe decay.
Wrapping up and next steps
Investing in tree brace support is a game-changer for nurturing young trees into resilient, long-lived giants. 🌳 With the right materials and techniques, you’ll protect them from wind, pests, and uneven growth—saving time, effort, and even heartache down the road.
Whether you’re a seasoned gardener or a first-time tree owner, this simple step ensures your trees thrive for decades to come.
Ready to take action? Start by assessing your trees today—measure, gather supplies, and install braces before storms or high winds arrive. Your future shade (and wallet) will thank you!