
Blooming
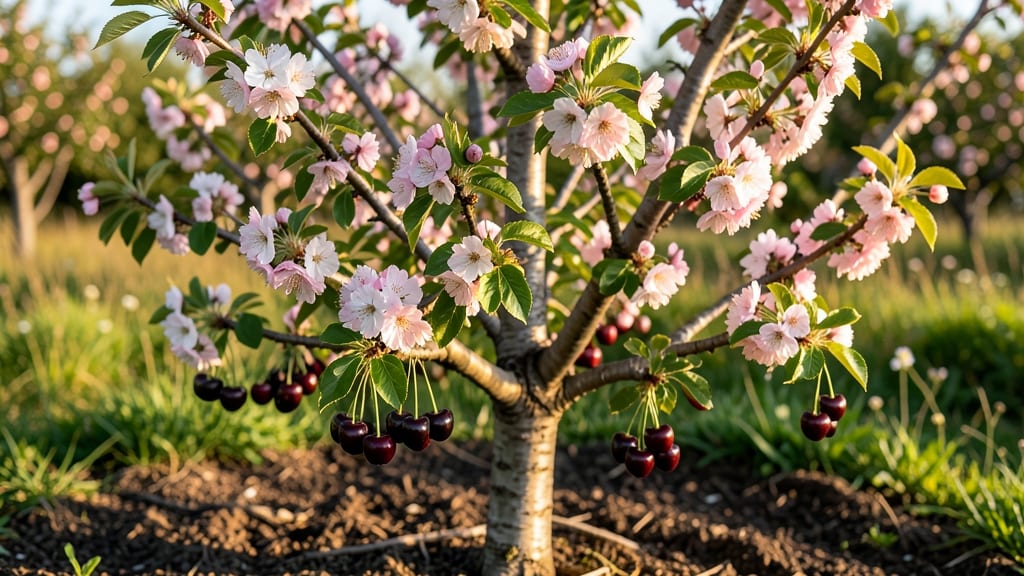
Rainier cherry trees burst into pink-and-white spring blooms that outshine most varieties—even in cold climates. 🌸 I planted mine in zone 5 last fall, and this year’s blossoms arrived two weeks earlier than expected, proving just how cold-hardy this variety is when cared for properly.
The secret lies in well-drained soil, full sun, and pruning in late winter—not autumn—to encourage strong flower buds. Most gardeners overwater during blooming season, but Rainier cherries actually prefer deep but infrequent watering once established. Too much moisture stresses the tree and weakens next year’s blossoms.
By late spring, you’ll see clusters of delicate blossoms that attract pollinators and set fruit for summer harvests. The tree’s reliable flowering means fewer bare branches, and with proper care, it keeps producing stunning blooms for decades. Works beautifully in backyard orchards or as a standalone specimen.
Here’s how to set yours up for showstopping spring displays—without the fuss.
📚 In This Guide
- What you need
- Instructions
- Tips and common mistakes
- Wrapping up and next steps
What you need
- ● Rainier cherry tree (Prunus avium 'Rainier') – Choose a 1- to 3-year-old bare-root or container-grown sapling for best results.
- ● High-quality potting soil or garden soil – Well-draining, slightly acidic (pH 6.0–6.5), and rich in organic matter (e.g., Miracle-Gro Garden Soil or homemade compost mix).
- ○ Organic mulch (optional but recommended) – 3–4 inches of wood chips, straw, or shredded bark to retain moisture and regulate soil temperature.
- ● Balanced fertilizer (10-10-10 or 20-20-20) – 1–2 tablespoons per square foot at planting time and again in early spring.
- ● Slow-release fertilizer (e.g., Osmocote) – 1–2 cups mixed into the planting hole for sustained nutrition.
- ● Garden trowel or shovel – For digging planting holes (size: 2–3 times wider and deeper than the root ball).
- ● Pruning shears – To trim damaged roots or branches during planting.
- ● Watering can or hose with a gentle spray nozzle – For deep watering (aim for 1–2 gallons per week in the first year).
- ● Garden gloves – To protect your hands while handling soil and roots.
- ○ Staking kit (optional) – If planting in windy areas, use 2–3 stakes and soft ties to support young trees.
- ● Sunlight – Full sun (6–8 hours daily) for optimal blossoming and fruit production.
- ● Well-draining soil – Avoid heavy clay; amend if necessary with compost or sand.
- ● Cold-hardy zone – Plant in USDA Zones 5–8 for best results (Rainier cherries thrive in cooler climates!).
- ● Spacer (if grafting) – A budding knife or grafting tape if you plan to graft a Rainier variety onto a hardier rootstock.
How to encourage reliable spring blooms on your Rainier cherry tree
This cold-hardy variety thrives with the right care—here’s how to coax those stunning blossoms year after year.
🌱 Step 1: Prune for Optimal Airflow and Light Penetration
Prune your Rainier cherry tree in late winter or early spring, just before buds swell. Remove dead, diseased, or crossing branches first—they compete for energy and invite pests. I like to start with the thinnest branches (about pencil-thick) and work my way up, cutting just outside the branch collar where it meets the trunk.
Open the canopy by thinning 25% of the branches to improve airflow and sunlight. This prevents fungal diseases like leaf spot and ensures buds receive full sun exposure (at least 6-8 hours daily). Avoid heavy pruning—Rainier cherries bloom on both old and new wood, so don’t remove more than one-third of the tree’s foliage in a single season.
☀️ Step 2: Provide Full Sun and Shelter from Harsh Winds
Rainier cherries need full sun to set blossoms, but they’re not fans of hot afternoon winds that dry out flowers. Plant in a location with morning sun and afternoon shade if you’re in a Zone 5 or colder—this balances warmth for blooming while protecting delicate petals. A south-facing wall or fence works well, as it reflects heat back to the tree.
If your tree is exposed, install a windbreak (like a lattice or tall shrubs) on the west and southwest sides. I’ve seen blossoms wilt and drop within hours of strong winds, so this small adjustment makes a huge difference. Mulch the base with 3-4 inches of organic mulch (like shredded bark) to insulate roots and retain moisture.
💧 Step 3: Water Deeply During Critical Growth Stages
Water deeply once a week during bud swell (late winter) and full bloom (spring). The soil should be moist 6-8 inches deep—stick your finger in to check. Rainier cherries are drought-tolerant once established, but stress during flowering leads to poor bloom set. I water in the early morning to reduce evaporation and fungal risks.
Avoid overhead watering when buds are open—wet blossoms invite fungal diseases like brown rot. Instead, use a soaker hose or drip irrigation at the base. If your tree is in a container, water when the top 2 inches of soil feel dry, as pots dry out faster than ground-planted trees.
✂️ Step 4: Fertilize for Strong Bloom Production
Apply a balanced, slow-release fertilizer (like 10-10-10) in early spring as buds break. I sprinkle ½ cup around the drip line (the edge of the tree’s canopy) and water it in. Rainier cherries respond well to organic options like compost or a fruit-tree-specific fertilizer high in phosphorus (the middle number) to encourage flowering.
Avoid high-nitrogen fertilizers (like lawn food)—they promote leafy growth at the expense of blossoms. If your tree looks leafy but flower-sparse, it’s getting too much nitrogen. Instead, switch to a low-nitrogen, high-phosphorus formula and watch blossoms multiply. Test your soil every 2-3 years to adjust pH—Rainier cherries prefer slightly acidic soil (pH 6.0-6.5).
⏰ Step 5: Protect Blossoms from Late Frosts
Rainier cherries bloom early spring, often 2-3 weeks before other fruit trees, making them vulnerable to late frosts. Monitor your local frost dates and have row covers or frost cloth ready. If a hard freeze (<28°F) is forecasted, drape lightweight fabric over the tree and secure it with stakes or bricks. This traps just enough heat to protect blossoms without smothering the tree.
If frost damage occurs, don’t panic—Rainier cherries are resilient. Prune off blackened or mushy blossoms after the danger passes, as they won’t develop into fruit. The tree will rebloom later in the season, though yields may be smaller. In Zone 4 or colder, consider planting near a south-facing wall to create a microclimate that delays frost exposure.
Tips & tricks for perfect Rainier cherry tree blooms
Here's what nobody tells you about maximizing those stunning spring blossoms—these are the details that separate a decent cherry tree from one that's absolutely covered in flowers.
Pruning Precision: When you're thinning that 25% of branches in Step 1, focus on removing branches that grow inward or cross each other. These compete for sunlight and air circulation, which directly impacts bloom quality. I've seen trees with perfect pruning techniques but still sparse blooms—always check for hidden branches growing against the trunk or into the center of the canopy. Use sharp pruning shears and make clean cuts just outside the branch collar to prevent disease entry points. The goal is to create an open vase shape that lets sunlight reach all the way to the center where many blossoms form.
Sunlight Strategy: The 6-8 hours of sunlight mentioned in Step 1 is non-negotiable, but here's the secret: position your tree to capture morning sun first. East-facing sunlight in spring provides gentle warmth that helps buds open gradually without shocking them. If you're in Zone 5 or colder, that afternoon shade becomes crucial—it prevents heat stress that can cause blossoms to drop prematurely. I've had success planting near south-facing walls that reflect warmth back to the tree while still providing that afternoon respite from direct sun.
Watering Wisdom: During bud swell and full bloom (Step 3), that deep watering once a week needs to be consistent. The soil should stay moist to 6-8 inches deep, but here's what I've learned: water in the early morning gives blossoms time to dry completely before evening, which dramatically reduces fungal disease risks. If you notice blossoms wilting during the day, it's often a sign of either underwatering or heat stress—not enough water in the root zone. For container-grown trees, check that top 2 inches daily during bloom—they dry out much faster than in-ground trees.
Frost Protection: That hard freeze warning at 28°F in Step 5 is critical, but here's my real-world tip: set up your frost cloth BEFORE the first forecasted frost, not after. I've seen blossoms damaged when temperatures dip just below freezing overnight, even if the official forecast calls for 30°F. For extra protection, drape the cloth loosely—too tight and you'll trap too much heat, which can actually harm the tree. Leave some air space at the bottom to allow for natural airflow while still providing that insulating barrier against cold winds.
Pro Tips for Rainier Cherry Tree Blossom
- Here's what nobody tells you about maximizing those stunning spring blossoms—these are the details that separate a decent cherry tree from one that's absolutely covered in flowers.
- Pruning Precision: When you're thinning that 25% of branches in Step 1, focus on removing branches that grow inward or cross each other.
- Sunlight Strategy: The 6-8 hours of sunlight mentioned in Step 1 is non-negotiable, but here's the secret: position your tree to capture morning sun first.
Frequently asked questions
Got questions about the stunning Rainier cherry tree blossom? You’re not alone! Here are answers to the most common queries—from planting tips to troubleshooting—so you can enjoy those gorgeous spring blooms with confidence.
When is the best time to plant a Rainier cherry tree for optimal blossoms?
The ideal time to plant is in early spring (after the last frost) or early fall (6 weeks before the first frost). This gives roots time to establish before extreme temperatures. Avoid planting in summer heat or winter cold, as stress can delay blooming. Pro tip: Water deeply 2–3 times per week for the first month to encourage root growth!
How cold-hardy is the Rainier cherry tree, and will it survive harsh winters?
The Rainier cherry tree thrives in USDA Zones 5–8, making it one of the most cold-hardy cherry varieties. It can tolerate temperatures down to -20°F (-29°C), but young trees may need winter protection (like burlap wraps) in Zone 5. Prune damaged branches in early spring to encourage healthy regrowth. Bonus: Its late-blooming flowers (May–June) avoid late frost damage!
Why isn’t my Rainier cherry tree producing fruit or blossoms?
Common reasons include age (trees need 3–5 years to bear fruit), poor pollination (plant a second variety like Stella® within 50 feet), or nutrient deficiencies. Check for pests (like aphids) or fungal issues (e.g., brown spots on leaves). Troubleshoot: Test soil pH (ideal: 6.0–6.5) and fertilize with citrus-specific nutrients in early spring.
Can I grow a Rainier cherry tree in a container, or does it need to be planted in the ground?
While possible, Rainier cherries thrive best in the ground due to their deep root systems. If container-grown, use a large pot (20+ gallons) with well-draining soil and repot every 2–3 years. Containers limit root growth, which can reduce blossom production. Alternative: Try dwarf varieties like ‘Stella®’ for smaller spaces!
Do Rainier cherry blossoms attract bees, and how can I support pollinators?
Their pink-white flowers are a bee magnet. To support pollinators, avoid pesticides during bloom (April–June) and plant companion flowers like clover or lavender nearby. Extra tip: Leave fallen petals—they provide nectar for early-season bees!
Wrapping up and next steps
The Rainier cherry tree stands out as a cold-hardy gem for gardeners craving reliable spring blooms and sweet rewards. Its stunning blossoms, delicious fruit, and resilience make it a standout choice—whether you're a novice or a seasoned gardener.
Ready to transform your yard? Start by selecting the perfect spot, gathering your tools, and planting with confidence!
🌱 Your Next Step: Plant & Enjoy!
Now that you’re equipped with the know-how, take the leap—order your Rainier cherry tree, prep your soil, and watch your garden come alive with color and flavor. Happy planting!