
Pruning
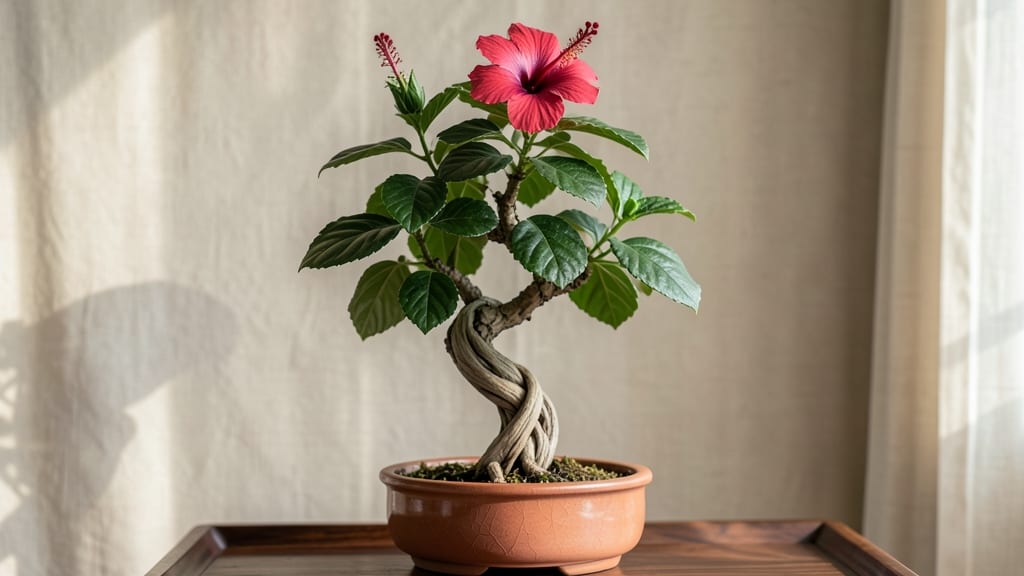
Transforming your living space with a braided hibiscus tree starts with understanding its indoor quirks. 🌿 These stunning plants thrive with bright indirect light—think east-facing windows or a few feet from a south window—where they'll reward you with glossy leaves and occasional blooms.
The braided trunk isn't just decorative; it's a training technique that keeps the plant compact and manageable in small spaces.
Your braided hibiscus needs a well-draining mix that prevents soggy roots, and watering when the top inch of soil feels dry to the touch keeps it happy. Humidity is key—misting leaves daily or placing the pot on a pebble tray helps recreate its tropical home.
Pruning isn't just about shape; it encourages bushier growth and prevents legginess, which is the #1 indoor problem I see with these plants.
What you'll end up with is a lush, living centerpiece that stays contained—no sprawling branches or outgrown spaces. The braided trunk becomes a conversation piece, while the glossy foliage adds texture to any room. Yellow leaves? Usually a watering issue. Drooping? Time to check humidity or light exposure.
Perfect for apartments, offices, or sunrooms where space is limited but style matters. With the right care, your braided hibiscus will stay compact, healthy, and stunning for years. Here's how to get started without the common pitfalls.
📚 In This Guide
- What you need
- Instructions
- Tips and common mistakes
- Wrapping up and next steps
What you need
- ● Hibiscus plant: 1 mature, flexible hibiscus sapling (preferably Hibiscus rosa-sinensis or Hibiscus syriacus), 2–3 feet tall with pliable branches.
- ● Pruning shears: 1 pair of sharp, sterilized shears (or small scissors for precision cuts).
- ● Support structure: 1 wooden dowel, bamboo stake, or sturdy wire (½–¾ inch thick, 3–4 feet long).
- ● Twine or plant ties: 1 roll of soft, biodegradable twine or stretchy plant tape (avoid plastic that can damage branches).
- ● Balanced fertilizer: 1 small bottle of liquid fertilizer (e.g., 10-10-10 NPK ratio) for post-pruning care.
- ● Gloves: 1 pair of gardening gloves (to protect from thorns and sap).
- ● Pruning paste: 1 small tube to seal cuts and prevent disease.
- ● Spray bottle: For misting leaves during the braiding process.
- ● Decorative elements: Moss, beads, or ribbons to enhance the aesthetic (if styling for display).
- ● Grow lights: 1–2 LED grow lights (if your space lacks natural light).
Step-by-Step guide to training a hibiscus braided tree indoors
Here's how to create a stunning, space-saving hibiscus tree with a braided trunk—no green thumb required.
🌱 Step 1: Select and Prepare Your Hibiscus Seedling
Start with a 4-6 inch tall hibiscus seedling with flexible stems (younger plants braid best). Choose a variety like 'Dwarf Tropical Hibiscus' or 'Hawaiian Sunset'—their smaller size adapts better to indoor braiding. Inspect the stems for three to five equal-length branches at the base; these will form your braid.
Water the plant thoroughly 24 hours before braiding so the soil is moist but not soggy. This prevents stem breakage when you manipulate the branches. If your plant has outgrown its pot, repot into a slightly larger container with well-draining potting mix to support new growth.
🪴 Step 2: Begin the Braiding Process
Gently remove the hibiscus from its pot and examine the three main stems at the base. If they’re uneven, trim the longest one back to match the others using clean pruning shears. This ensures symmetry as you braid. Hold the plant at soil level—the braid will start just above the root ball.
Cross the left stem over the middle, then the right stem over the new middle. Secure the intersection with a soft plant tie (not wire—it can cut into stems). Repeat this crisscross pattern, alternating directions every 2-3 inches up the trunk. Stop braiding when the stems reach 6-8 inches tall—this prevents stress on young plants.
☀️ Step 3: Provide Ideal Growing Conditions
Place your braided hibiscus in bright, indirect light (east or west windows work best). Hibiscus needs 6-8 hours of light daily, but direct afternoon sun can scorch leaves. If natural light is limited, supplement with a grow light kept 12-18 inches away for 12-14 hours per day.
Water when the top inch of soil feels dry—hibiscus hates soggy roots but also dislikes drought. Use room-temperature water and avoid wetting the leaves to prevent fungal issues. Fertilize every 4-6 weeks with a balanced liquid fertilizer (10-10-10) diluted to half strength during active growth.
✂️ Step 4: Maintain Shape and Encourage Fullness
Once the braided trunk reaches 12-18 inches tall, pinch back the top set of leaves to encourage bushier growth. This redirects energy to lateral branches, creating a fuller canopy. Prune leggy stems in early spring to maintain shape—cut just above a leaf node where new growth will emerge.
Rotate the pot quarter-turn weekly so the plant grows evenly toward the light. If you notice one braided stem growing faster than others, trim the dominant one slightly to balance growth. Mulch the soil surface with orchid bark to retain moisture and keep roots cool.
⏰ Step 5: Winter Care for Braided Structure
During winter months (when growth slows), reduce watering to every 7-10 days and withhold fertilizer entirely. Hibiscus enters dormancy in cooler conditions, so move it away from heat sources like vents. If your home stays below 60°F, expect slower growth—this is normal.
Check the braided trunk monthly for loosening ties. Gently retighten plant ties as needed, but avoid wrapping too tightly—you should be able to fit a finger between the stems and the tie. If a braid slips, don’t panic; simply adjust and secure it. With patience, your hibiscus will develop a permanent, elegant braided trunk over 1-2 years.
Tips & tricks for perfect indoor hibiscus braided trees
Transforming your hibiscus into an elegant braided tree takes patience—but these tricks will help you avoid common pitfalls and create a stunning centerpiece.
Plant Selection Matters: The 24-hour pre-watering before braiding is crucial, but don't overlook stem flexibility. Younger seedlings with stems about as thick as a pencil braid beautifully, while woody stems snap easily. I've learned this the hard way—my first attempt with mature stems ended with broken branches! Choose varieties like 'Dwarf Tropical Hibiscus' specifically bred for indoor training.
Braiding Technique: When securing those first crisscross ties in Step 2, leave just enough room to slide a finger between the stems and the plant tie. Too tight and you'll restrict growth; too loose and the braid will unravel. I mark my ties with a tiny dab of white correction fluid so I can spot them easily when it's time to adjust them later. Alternate directions every 2-3 inches to create that signature spiral pattern.
Lighting Strategy: That 6-8 hours of daily light is non-negotiable, but don't assume all bright light works. South-facing windows can scorch leaves—test with your hand first. If you notice leaves curling toward the light, rotate the plant quarter-turn daily instead. For grow lights, position the bulb 12-18 inches away and use a timer for consistent 12-14 hours of light. I keep mine on a plug-in timer set to mimic natural daylight cycles.
Winter Survival: The 60°F threshold is your guide for winter care. Below this, hibiscus growth naturally slows, but don't let the plant get chilly—keep it away from drafts and cold windows. I've found that moving my braided hibiscus to a warmer spot near a sunny window (but not touching glass) prevents the ties from drying out and becoming brittle. Check those ties monthly even in winter—they can loosen unexpectedly when growth slows.
Pro Tips for Hibiscus Braided Tree Indoor
- Transforming your hibiscus into an elegant braided tree takes patience—but these tricks will help you avoid common pi...
- Plant Selection Matters: The 24-hour pre-watering before braiding is crucial, but don't overlook stem flexibility. Yo...
- Braiding Technique: When securing those first crisscross ties in Step 2, leave just enough room to slide a finger bet...
Frequently asked questions
How often should I prune my indoor hibiscus braided tree?
Prune your hibiscus braided tree every 4–6 weeks during the growing season (spring and summer) to encourage bushier growth. Light trims also help maintain its compact shape. Avoid heavy pruning in fall/winter—this is its resting phase. Always use clean, sharp tools to prevent disease.
What’s the best way to care for it in winter?
Indoor hibiscus trees need less water and warmth in winter. Reduce watering to every 2–3 weeks (let soil dry slightly between waterings) and keep it away from drafts or cold windows. If leaves yellow, it’s often overwatered—adjust and monitor closely. A humidifier nearby can help combat dry indoor air.
Can I grow a hibiscus braided tree from cuttings?
Take 4–6 inch cuttings from healthy stems in spring/summer, dip in rooting hormone, and plant in moist perlite or sand. Keep them warm (70–75°F) and humid under a plastic bag until roots form (4–8 weeks). Once rooted, transplant to soil and care for it like a mature plant.
Why are my hibiscus leaves dropping?
Leaf drop is usually caused by overwatering, underwatering, or stress (like drafts or sudden temperature changes). Check soil moisture—it should be slightly dry between waterings. Also, ensure it’s in bright, indirect light (no harsh sun). If pests like spider mites are present, treat with neem oil or insecticidal soap.
Is this tree suitable for small apartments?
Yes! The braided hibiscus tree thrives in containers and stays compact (3–5 feet tall) with regular pruning. Place it near a south- or west-facing window for optimal light. Rotate it occasionally for even growth, and use a self-watering pot if you travel often to maintain moisture.
Wrapping up and next steps
Transforming your small space with a hibiscus braided tree isn’t just about aesthetics—it’s about reclaiming control over your indoor greenery with creativity and care. 🌿 Whether you’re a pruning pro or a curious beginner, this method proves that even limited space can bloom into something extraordinary.
Ready to elevate your home’s vibe? Grab your tools, embrace the process, and let your hibiscus braided tree become the centerpiece of your cozy corner!
🌱 Next Steps:
- Start small: Pick one branch to practice your braiding technique before tackling the whole tree.
- Document progress: Snap photos to track your tree’s growth and styling evolution.
- Share the love: Inspire others by posting your masterpiece online—tag us @YourGreenSpace!