
Pruning
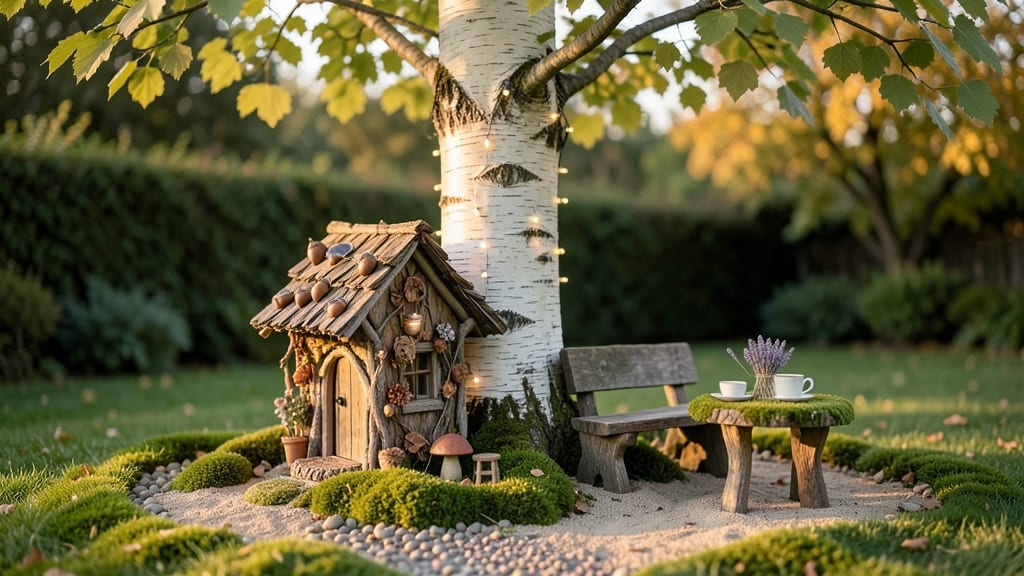
Turn an old tree trunk fairy home into a tiny haven that looks like it’s been there for centuries. 🌿 The magic starts with a simple piece of wood, a few tools, and a dash of imagination—no special skills required.
I’ve turned forgotten stumps into storybook doorways, and my garden’s charm has never been more inviting. You’ll need basic supplies: sandpaper, paint, tiny furniture pieces (or even acorn caps), and moss for texture.
The key is blending it with nature—place it near ferns or wildflowers so it feels like the fairies have always lived there. A tiny lantern or solar light adds evening enchantment. By the time you’re done, you’ll have a whimsical spot that sparks joy every time you walk by.
Kids (and adults!) will love imagining who might live inside, and the garden gains a focal point that’s uniquely yours. Works in any yard—wooded, cottage-style, or even urban. The only rule? Make it feel like it belongs.
📚 In This Guide
- What you need
- Instructions
- Tips and common mistakes
- Wrapping up and next steps
What you need
- ● Tree trunk or large branch: 1–2 pieces (6–12 inches in diameter, weathered or freshly cut). Look for natural hollows or carve a small entrance!
- ● Natural wood: Small sticks, twigs, or bark scraps (for walls, furniture, or pathways). Collect at least 1–2 cups worth.
- ● Moss or lichen: 1–2 handfuls (for roofing, walls, or a cozy green carpet). Harvest from damp, shaded areas.
- ● Acrylic paint: 1–2 small bottles (earthy tones like brown, green, or pastel blues/purples for fairy magic). Use non-toxic, outdoor-safe paint.
- ● Paintbrushes: 2–3 sizes (thin for details, medium for larger areas). A sponge brush works for textured effects!
- ● Hot glue gun + glue sticks: 1 (for securing lightweight materials like moss or small decorations).
- ● Twine or jute string: 1 small spool (for hanging doors, curtains, or climbing vines).
- ● Small pebbles or sand: 1/2 cup (to create a "ground" or pathway around the home).
- ● Fairy door (pre-made or DIY from wood/bark).
- ● Acrylic gems or beads (for "fairy lights" or window accents).
- ● Miniature furniture (toy-sized chairs, tables, or mushrooms from a craft store).
- ● Non-toxic glitter or biodegradable confetti (for a sparkly fairy touch).
- ● Essential oils (like lavender or citrus) mixed with water for a "fairy perfume" spray.
- ● Solar-powered fairy lights (for an enchanted nighttime glow!).
Step-by-Step instructions for building a tree trunk fairy home
Here’s how to craft a magical fairy dwelling that’ll charm your garden and welcome tiny visitors.
🪴 Step 1: Choose and Prepare Your Tree Trunk Base
Select a small, hollowed-out tree trunk—about 12-18 inches tall—or a sturdy log with natural cavities. If using a solid log, carve a tiny door and window openings with a small hand saw or drill (safety first—wear gloves!). Sand rough edges smooth so fairies won’t snag their wings. Place the trunk in a shaded spot near host plants like clover or ferns, where fairies love to gather.
For extra whimsy, drill a few peepholes around the door so fairies can spy on your garden. Use a 1/8-inch bit for tiny, fairy-sized details. If your trunk is too heavy, anchor it with stakes and twine to keep it steady. I like to bury the base 2-3 inches deep in the soil for stability—just enough to hide the stakes but leave the fairy door visible.
🌿 Step 2: Decorate with Natural and Handmade Touches
Gather moss, lichen, and tiny flowers from your garden to create a cozy fairy landscape. Press moss into the trunk’s exterior like a living carpet, using a spray bottle to mist it into place. For the roof, layer small bark slices or a tiny thatched roof made from twine-wrapped twigs. Secure everything with non-toxic glue or hot glue (out of reach of pets/kids)—fairies prefer natural adhesives like dried sap or honey for authenticity.
Add a miniature door knocker (a tiny acorn or shell) and a fairy-sized chair (a toadstool or carved wooden stool). I like to paint tiny details with acrylic paint—think golden door handles or pastel window frames—but let them dry completely before inviting fairies to move in. If you’re feeling extra creative, weave a tiny curtain from thin fabric strips to hang in the window.
☀️ Step 3: Furnish the Interior for Fairy Comfort
Line the inside with soft moss or dried grass for a plush fairy bed. Add a miniature table (a flat stone or slice of bark) and tiny chairs (more toadstools or pebble clusters). For lighting, place tiny LED tea lights (solar-powered or battery-operated) near the door—fairies adore a warm glow. I tuck in fairy-sized dishes (small clay pots or acorn caps) and a tiny broom (a feather or twig) to complete the scene.
Leave a tiny path of pebbles or flower petals leading to the door—fairies love a well-trodden welcome mat! For extra magic, sprinkle fairy dust (crushed biodegradable glitter or dried flower petals) around the base. Avoid plastic or anything that might harm real garden creatures. The goal is to create a living space that feels like it’s always been there, not a toy.
⏰ Step 4: Invite the Fairies and Maintain the Magic
Leave the fairy home empty for 24 hours after building—fairies are shy and need time to explore. Then, place tiny offerings like dewdrops (morning water droplets), flower petals, or a drop of honey near the door. Fairies will test the space and eventually move in! Check weekly to refresh moss, replace wilting flowers, and top off fairy supplies. If rain washes away decorations, rebuild them—fairies appreciate effort.
To keep the magic alive, whisper a fairy welcome when you pass by or leave tiny gifts occasionally (like a shiny pebble or a feather). Over time, you’ll notice new additions—fairies often leave tiny shells, feathers, or acorns as thanks. If the home starts to look worn, refresh the decor in spring to match the season. With care, your fairy home will become a beloved garden landmark for years to come.
Tips & tricks for perfect tree trunk fairy homes
Here's what I've learned after building these magical little dwellings—tricks that'll make yours feel like it's been here for centuries.
Fairy-Sized Precision: When drilling door and window openings in Step 1, use a 1/8-inch bit for that perfect fairy scale. I mark the spot with a pencil first, then drill slowly to avoid splintering. For extra charm, add tiny nails or acorn caps as decorative hinges around the door—fairies love details like this! Remember, the goal is to create a space that feels intentional, not toy-like.
Moss Magic: In Step 2, gather your moss from shaded, damp areas—it'll stay fresher longer. Before pressing it onto the trunk, give it a quick mist with your spray bottle, then let it sit for 5-10 minutes to plump up. This creates that lush, lived-in look. For a more natural adhesion, use a small amount of diluted honey instead of glue—fairies would approve of this natural touch.
Seasonal Adaptations: The 24-hour empty period in Step 4 works year-round, but consider seasonal variations. In spring, add fresh clover blossoms or dandelion petals> to the welcome path. For winter, swap these for evergreen sprigs> or pinecones> to keep the magic alive during colder months. Fairies appreciate seasonal decor just like we do!
Lighting Safety: For the tiny LED tea lights in Step 3, I recommend using solar-powered or battery-operated> options to avoid any fire hazards. Place them near the door but out of reach of curious pets or children. You can also create a "fairy lantern" by placing a light inside a small glass jar> with pebbles and water for a magical glow effect.
Pro Tips for Tree Trunk Fairy Home
- Here's what I've learned after building these magical little dwellings—tricks that'll make yours feel like it's been here for centuries.
- Fairy-Sized Precision: When drilling door and window openings in Step 1, use a 1/8-inch bit for that perfect fairy scale.
- Moss Magic: In Step 2, gather your moss from shaded, damp areas—it'll stay fresher longer.
Frequently asked questions
Got questions about creating your own tree trunk fairy home? You’re not alone! Here are some of the most common queries—and their magical solutions.
What’s the best type of tree for a fairy home?
Choose a tree with a hollow trunk or natural cavities, like oak, maple, or willow. Avoid softwoods (e.g., pine) that rot quickly. Dead or dying trees work too—just ensure they’re safe and stable for climbing. If your tree lacks cavities, carve a small entrance (gently!) or use a pre-drilled hole kit.
How long does it take to build a fairy home?
Most projects take 1–3 hours, depending on complexity. A basic moss-and-stick dwelling can be done in under an hour, while intricate designs (like mushroom roofs or twig bridges) may require a weekend. Pro tip: Work in short bursts—fairies appreciate patience!
Can I use artificial materials (like plastic mushrooms)?
Natural materials (moss, bark, acorns) create the most charm, but weatherproof artificial elements (e.g., resin mushrooms, painted stones) last longer. Just avoid anything toxic or bright—fairies prefer muted, earthy tones.
Will insects or pests damage the fairy home?
Small critters (bees, beetles) might investigate, but they rarely harm the structure. To deter pests:
- Use cedar shavings (natural repellent) in the base.
- Avoid decaying wood—opt for dry, untreated materials.
- Add a tiny water dish (like a thimble) to attract beneficial insects instead.
How do I protect the fairy home from rain or wind?
Seal natural materials with non-toxic wood glue or beeswax for water resistance. For wind, anchor the home with:
- Twine or wire wrapped around the trunk.
- A low, curved roof (like a mushroom cap) to deflect rain.
- Placing it on the shady side of the tree.
What’s the best time of year to build one?
Spring or early fall are ideal—mild weather lets materials dry properly, and fairies love fresh starts! Avoid winter (fragile materials) or summer (rapid decay). If you’re in a warm climate, build during cooler mornings to prevent glue or moss from drying too fast.
Wrapping up and next steps
Transforming a tree trunk into a fairy home isn’t just about adding charm to your garden—it’s a magical way to spark creativity and connect with nature.
Whether you’re a seasoned DIYer or a beginner, this project is a delightful blend of simplicity and whimsy. Now that you’re armed with materials, tips, and answers to common questions, it’s time to get crafting! 🌿✨
Next steps:
- Sketch your design on paper first—let your imagination run wild!
- Gather your supplies and start small if you’re new to woodwork.
- Share your fairy home with friends or even turn it into a garden centerpiece.