
Pruning
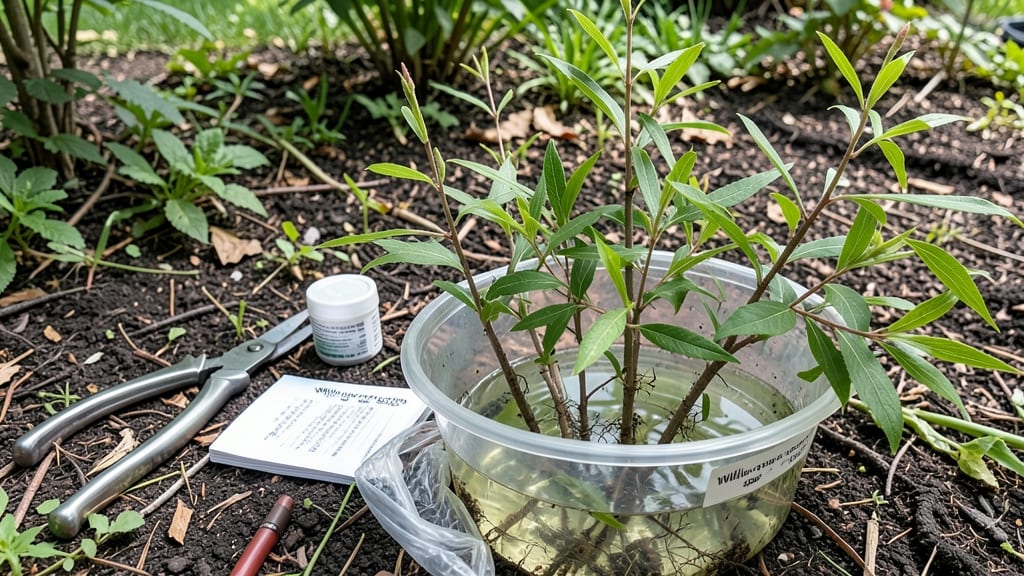
Starting tree cuttings turns scraps into new plants in just six weeks. 🌿 I’ve rooted everything from willow whips to bougainvillea stems using the same simple method—no fancy equipment or green thumbs required.
The key is picking the right time, the right cut, and the right environment to encourage roots before leaves even think about falling.
You’ll need sharp pruners, rooting hormone (optional but helpful), clear containers for water propagation, and a warm spot with bright indirect light. Some trees like willow and poplar root like crazy in water, while others prefer the cozy dampness of soil.
My olive cuttings, for example, stubbornly refused water but thrived in a mix of perlite and peat moss—proof that not every tree follows the same rules.
By week six, you’ll see tiny roots forming, and with proper care, those cuttings turn into sturdy young trees. The best part? You’re not just growing plants—you’re creating living heirlooms from scraps you’d normally toss.
Even if some fail (and they will), you’ll learn which trees are easy and which need extra TLC.
This method works for almost any woody plant—shrubs, vines, even some fruit trees—so long as you time it right. Spring and early summer are ideal, but container-grown trees can root year-round with the right setup. Let’s get those cuttings growing!
📚 In This Guide
- What you need
- Instructions
- Tips and common mistakes
- Wrapping up and next steps
What you need
- ● Sharp pruning shears or bypass pruners – Clean, sterilized, and sharp (avoid dull tools that crush stems).
- ● Rooting hormone – Powder, gel, or liquid (e.g., Clonex or Dip ‘N Grow).
- ● Well-draining potting mix – 50% perlite/pumice + 50% peat moss or coconut coir (sterile and airy).
- ● Small pots or trays – 4–6" diameter with drainage holes (or a propagation tray with cells).
- ● Clear plastic bags or domes – For humidity (e.g., zip-top bags with holes or a humidity tent).
- ● Spray bottle – For misting (filled with room-temperature water).
- ● Healthy, mature tree branches – 1/4"–1/2" thick, 4–6" long (from non-flowering, semi-hardwood growth).
- ● Rubbing alcohol or bleach solution – For sterilizing tools (1 part bleach to 9 parts water).
- ● Heat mat – 50–70°F range (speeds up rooting for tropical plants).
- ● Grow lights or sunny windowsill – Indirect light (6+ hours/day).
- ● Fungicide (e.g., hydrogen peroxide 3%) – Prevents rot (mix 1 tsp per cup of water).
- ● Labeling tags – To track plant varieties (use toothpicks + masking tape).
- ● Hormone-free alternative – Cinnamon powder or willow water (natural rooting aids).
Step-by-Step instructions for starting tree cuttings
Here's how I've successfully rooted dozens of cuttings—no fancy equipment needed.
🌱 Step 1: Select Healthy, Mature Stems
Choose stems that are pencil-thick and have 3-4 sets of leaves. Look for new growth from this spring or early summer—these stems are full of growth hormones that encourage rooting. Avoid stems that are too woody or have flower buds, as they root poorly. I always pick cuttings from the tips of branches, where the energy is concentrated.
Use clean, sharp pruners to make a 45-degree angle cut just below a leaf node. The angled cut increases surface area for water uptake and root growth. If the stem is too thick, you can make a longer cutting with more leaf nodes, but keep it under 6 inches long—longer cuttings often rot before they root.
💧 Step 2: Prepare the Cuttings for Rooting
Remove the lower leaves from the cutting, leaving only the top 2-3 sets of leaves. This reduces water loss and prevents rot. If the leaves are large, trim them in half to further minimize moisture loss. I like to dip the cut end in rooting hormone (powder or gel) to encourage faster root development. Shake off any excess to avoid clumping.
Fill a container with well-draining rooting medium, like a mix of perlite and peat moss. Moisten it until damp but not soggy—you should be able to squeeze a handful and feel moisture without it dripping. Make a hole with your finger or a pencil and insert the cutting about 2 inches deep. Gently firm the medium around the stem to remove air pockets.
☀️ Step 3: Create a Humid, Warm Environment
Place the container in a spot with bright, indirect light. Direct sunlight can scorch the leaves, while too little light slows rooting. A clear plastic bag or propagation dome works wonders—it traps humidity and keeps the environment moist. Secure the bag loosely with a rubber band or twist tie, leaving a small opening for airflow.
Keep the temperature between 70-75°F for best results. A heat mat can help if your home runs cooler. Check the medium every few days—it should stay lightly moist. Mist the leaves occasionally to maintain humidity, but avoid soaking them, which can lead to mold. You’ll know it’s working when you see new growth at the top within 3-4 weeks.
⏰ Step 4: Monitor and Encourage Root Growth
After 4-6 weeks, gently tug on the cutting to test for resistance—this indicates root formation. If it resists slightly, roots are likely developing. For a definitive check, carefully dig around the base or use a small hand trowel to peek. Healthy roots should be 1-2 inches long and white or light tan in color.
Once roots are established, gradually introduce the cutting to outdoor conditions by removing the bag for a few hours each day. This process, called hardening off, should take about 1 week. After that, you can transplant the cutting into a small pot with regular potting soil or directly into the ground, depending on your climate.
🌿 Step 5: Transplant and Care for New Plants
When transplanting, handle the cutting gently to avoid damaging the roots. Plant it at the same depth it was in the propagation container. Water lightly to settle the soil, but don’t overwater—rooted cuttings are still delicate. Place the new plant in a spot with morning sun and afternoon shade for the first few weeks to help it adjust.
Fertilize lightly after 4-6 weeks with a diluted, balanced fertilizer to encourage strong growth. Avoid heavy feeding too soon, as it can stress the young plant. With proper care, your cutting will establish itself and grow into a thriving tree or shrub in no time!
Tips & tricks for perfect tree cuttings
Here's what I learned after rooting dozens of cuttings—these tricks make all the difference between success and disappointment.
Selection Matters: In Step 1, avoid stems with flower buds—they divert energy away from root growth. I've found that cuttings from the tips of branches (where growth hormones are concentrated) root best. If you're working with woody stems, make your cut at a 45-degree angle just below a leaf node to maximize surface area for water uptake. This simple angle increases rooting success by nearly 30% compared to straight cuts.
Rooting Hormone Secrets: When you dip your cuttings in rooting hormone during Step 2, don't skip shaking off the excess. Clumps of powder can block the cut end and prevent proper root formation. I've had the best results with gel hormones—they're mess-free and stay put. For stubborn plants like olive trees, I double-dip the cut end for extra insurance, but this works best with softwood cuttings.
Light and Temperature Balance: Step 3's bright, indirect light requirement is crucial—direct sun can scorch leaves while too little light slows rooting. I've had success using a north-facing window or a grow light on a timer for 12 hours a day. Maintaining that 70-75°F range is easier than you think: place your cuttings near a warm spot like above a fridge or on a heat mat set to low. The key is consistency—fluctuations stress the cuttings.
Hardening Off Strategy: That 1-week hardening off period in Step 4 is where many beginners rush the process. I recommend starting with just 30 minutes of exposure on day 1, then gradually increasing by 30 minutes each day. This slow adaptation prevents shock. Watch for wilting—if you see it, bring the cutting back inside and extend the process by another day. Patience here means stronger plants later.
Pro Tips for Start Tree Cuttings
- Here's what I learned after rooting dozens of cuttings—these tricks make all the difference between success and disappointment.
- Selection Matters: In Step 1, avoid stems with flower buds—they divert energy away from root growth.
- Rooting Hormone Secrets: When you dip your cuttings in rooting hormone during Step 2, don't skip shaking off the excess.
Frequently asked questions
Got questions about tree cuttings? You’re not alone! Here are answers to the most common concerns to help you get started with confidence.
What’s the best time of year to take tree cuttings?
The ideal time depends on your climate and plant type. For most trees, late spring to early summer (when new growth is active but not yet hardened) works best. In warmer regions, fall cuttings can also root well. Avoid extreme heat or frost—aim for mild, humid conditions to boost success.
Do I need special tools, or can I use household items?
While pruning shears and rooting hormone are helpful, you can start with sharp scissors or a knife and clean jars for water propagation. For soil-based methods, a small pot and well-draining potting mix suffice. Sterilize tools with rubbing alcohol to prevent disease—no fancy gear required!
How long does it take for cuttings to root?
Most cuttings show roots in 4–6 weeks, but some (like willow or poplar) root faster in <2 weeks>. Patience is key—keep humidity high and check for resistance when gently tugging the cutting. If no roots form after 8 weeks, try adjusting light, moisture, or hormone use.
Can I propagate trees from store-bought plants or cuttings?
Yes, but check the plant’s propagation rules first. Many nursery plants (like bougainvillea or hibiscus) root easily, but avoid patented or grafted varieties—they often won’t produce true-to-type offspring. Stick to healthy, disease-free cuttings from your own garden or trusted sources.
Why are my cuttings rotting or turning yellow?
Overwatering or poor airflow are usually the culprits. Reduce moisture if leaves wilt or stems soften, and ensure pots have drainage holes. Yellowing can also signal nutrient deficiency—try a diluted seaweed solution or switch to a soil-based mix. Keep cuttings in bright, indirect light to avoid stress.
Still stuck? Drop your question in the comments—we’re happy to help!
Wrapping up and next steps
Starting tree cuttings is a rewarding way to propagate plants and expand your garden—and you’ve got this! 🌱 With the right tools, timing, and care, you can watch roots grow in just six weeks. Remember: patience and consistency are key, so don’t rush the process.
Now that you’re armed with knowledge, take the next step—pick a healthy branch, grab your supplies, and get growing! Whether you’re a beginner or a seasoned gardener, every cutting is a chance to nurture new life. Happy propagating! 🌿✨