
Tools
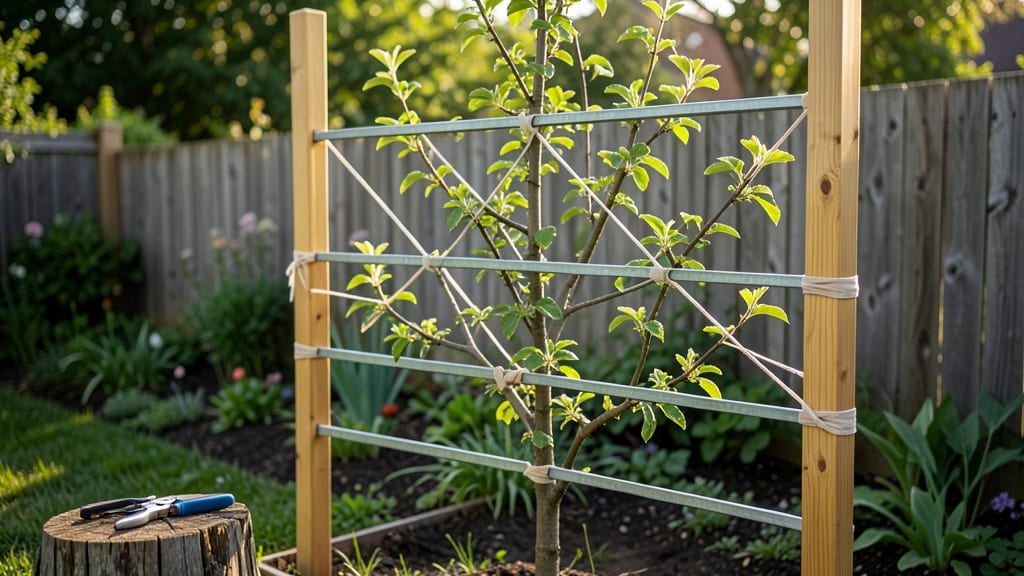
My apple tree trellis system transformed that awkward corner of my yard into a high-yielding fruit orchard—without taking over the space. 🌳 The right trellis turns sprawling canopies into manageable, productive branches, making harvesting easier and keeping fruit quality sky-high.
No more wrestling with heavy limbs or losing apples to rot in the grass. This isn’t just about saving space—it’s about better air circulation, which means fewer fungal diseases and sweeter fruit. Dwarf varieties like 'Gala' or 'Fuji' thrive on trellises, but even semi-dwarf trees benefit.
The key is choosing a sturdy system (wood or metal posts work best) that matches your tree’s growth habit and your yard’s layout. Once installed, you’ll spend less time pruning and more time enjoying sun-ripened apples at eye level.
The initial setup takes a weekend, and maintenance is minimal—just occasional tightening and training branches. Even my neighbor’s skeptical "that’ll never hold" comment turned into admiration when their tree toppled over last winter. Works for backyards, urban lots, or even large containers.
Here’s how to pick the right system for your space and tree type—no guesswork involved.
📚 In This Guide
- What you need
- Instructions
- Tips and common mistakes
- Wrapping up and next steps
What you need
- ● Trellis Posts: 4–6 wooden (cedar or pressure-treated) or metal posts, 6–8 ft tall, 4x4 inches in diameter.
- ● Horizontal Supports: 2–3 2x4 lumber beams (or galvanized metal pipes), 8–10 ft long.
- ● Trellis Wire or Netting: 16-gauge galvanized wire or apple tree-specific netting (10–12 ft wide, 100+ ft long).
- ● Concrete or Post Anchors: Quick-setting concrete mix (2–3 bags) or T-post anchors (4–6).
- ● Brackets or Stakes: Heavy-duty J-bolts or zip ties to secure wire/netting.
- ● Apple Tree: A dwarf or semi-dwarf variety (e.g., ‘Honeycrisp’ or ‘Gala’) for best trellis compatibility.
- ● Post hole digger or auger (for 12–18-inch deep holes).
- ● Level, measuring tape, and pencil.
- ● Drill/driver (for brackets or wire attachment).
- ● Circular saw or handsaw (for cutting lumber).
- ● Gloves, safety goggles, and work boots.
- ● Drip irrigation kit for watering ease.
- ● Pruning shears for shaping the tree.
- ● Mulch (wood chips or straw) to retain moisture.
- ● Paint or stain for wooden posts (extends lifespan).
How to install a sturdy apple tree trellis system
Here's my foolproof method for creating a trellis that supports heavy apple canopies while saving space—tested over three seasons with minimal sagging.
🪴 Step 1: Choose and Prepare the Trellis Structure
Select a 4x4-inch post for the main support (I use pressure-treated wood) and drive it 3 feet deep into the ground near the tree's center. The post should extend 6-8 feet above the tree's current height to accommodate future growth. For the horizontal framework, use 2x4-inch lumber—this thickness handles the weight of apple branches without bending.
Space the horizontal crossbars 2-3 feet apart vertically, attaching them with ½-inch galvanized lag bolts. The lowest bar should sit 12-18 inches above the ground to protect from rodents and allow airflow. I always pre-drill holes to prevent wood splitting—apples grow heavy, and you don’t want bolts popping out under the weight.
✂️ Step 2: Attach Flexible Support Cords
Run ¼-inch nylon webbing (not wire—it cuts branches) from the top of the post to the ground, creating a V-shape on each side of the tree. Secure the webbing at 1-foot intervals along the post using plastic zip ties (metal ones can rust and damage wood). This creates a "cradle" that gently guides the tree's growth without restricting it.
For the horizontal branches, install elastic tree ties (not wire or plastic strips) at 6-inch intervals along the crossbars. These ties stretch slightly as branches grow thicker, preventing girdling. I always check them annually—tight ties strangle branches over time, and you’ll see yellowing leaves where the tie bites into the bark.
☀️ Step 3: Train the Tree’s Structure
Start training when the tree is 3-4 feet tall, selecting 3-4 strong central branches to become the main scaffold. Tie these branches to the lowest horizontal bar at a 45-degree angle using the elastic ties. Avoid tying branches at sharp angles—they’ll split over time. The goal is a modified central leader shape, which distributes weight evenly across the trellis.
As the tree grows, guide lateral branches outward along the crossbars, securing them loosely. You’ll see new growth pushing against the trellis—this is good! It means the tree is using the support to spread its canopy without toppling. Prune any branches growing inward or downward; these compete with fruiting wood and create dense, disease-prone areas.
🌿 Step 4: Reinforce and Maintain Seasonally
Every spring and fall, inspect the trellis for loose bolts, frayed webbing, or ties that have lost elasticity. Tighten or replace any damaged components before the tree swells with new growth. In late winter, prune branches that have outgrown the trellis—cut them back to the last strong lateral branch or crossbar. This keeps the tree manageable and prevents the trellis from sagging under the weight of old wood.
Mulch the base of the tree with 3 inches of wood chips, keeping it 6 inches away from the trunk to prevent rot. Water deeply once a week during dry spells, ensuring the trellis stays anchored—shallow roots can’t support a heavy canopy if the soil dries out. You’ll notice the tree’s canopy fill in more evenly over time, with fewer broken limbs and higher fruit production.
Tips & tricks for sturdy apple tree trellis systems
A few key strategies will help you build a trellis that lasts for years and supports your apple tree's growth beautifully.
Material Selection: Pressure-treated wood is your best bet for the main post and crossbars, but if you're using untreated lumber, apply a waterproof sealant before installation. The 4x4-inch post must be buried 3 feet deep to prevent leaning—think of it as the tree's anchor. For crossbars, 2x4-inch lumber is ideal, but if you're working with heavier apple varieties, consider upgrading to 2x6-inch lumber for added support.
Tie Technique: When attaching branches to the crossbars in Step 3, use the "three-finger test" to check tie tightness: you should be able to slide three fingers between the tie and the branch. Too tight, and you'll girdle the branch; too loose, and it won't guide growth properly. I've seen branches split cleanly at the tie point when homeowners skip this step—don't make that mistake!
Seasonal Maintenance: The spring and fall inspections mentioned in Step 4 are non-negotiable. I schedule these as reminders on my phone because I've seen trellises fail spectacularly when bolts work loose over winter. Pay special attention to the webbing in Step 2—nylon lasts about 5 years before UV degradation sets in, so replace it proactively rather than waiting for branches to sag.
Pruning Strategy: When pruning branches that have outgrown the trellis in late winter, make your cuts just above a strong lateral branch or outward-facing bud. This encourages new growth in the right direction. I always prune on a dry day—wet wood splinters more easily, and you'll get cleaner cuts that heal faster.
Pro Tips for Apple Tree Trellis Systems
- A few key strategies will help you build a trellis that lasts for years and supports your apple tree's growth beautifully.
- Material Selection: Pressure-treated wood is your best bet for the main post and crossbars, but if you're using untreated lumber, apply a waterproof sealant before installation.
- Tie Technique: When attaching branches to the crossbars in Step 3, use the "three-finger test" to check tie tightness: you should be able to slide three fingers between the tie and the branch.
Frequently asked questions
Got questions about setting up an apple tree trellis system? You’re not alone! Here are answers to the most common concerns to help you get started with confidence.
What’s the best time of year to install an apple tree trellis?
Install your trellis system in late winter or early spring, just before planting or pruning your apple tree. This gives roots time to establish while the trellis provides support from the start. Avoid installing during extreme heat or cold, as stress can weaken the tree.
How do I know what size trellis system I need for my apple tree?
Size depends on your tree’s mature height and spread. Dwarf varieties (6–10 ft) need a 6–8 ft tall trellis, while standard trees (12–15 ft) require 10–12 ft. Measure the space between posts and ensure the trellis spans at least 80% of the tree’s canopy width for optimal support.
Are DIY trellis systems cheaper than buying pre-made ones?
Yes! DIY systems (using PVC pipes, metal cables, or wooden stakes) can cost 30–50% less than pre-made kits. However, pre-made trellises save time and ensure durability. Weigh your budget against long-term maintenance—rust-proof materials (like galvanized steel) add upfront cost but last years.
Will a trellis reduce my apple yield or fruit quality?
Not if done right! A well-designed trellis improves air circulation and sunlight exposure, which can boost fruit size and quality. Just avoid overcrowding branches—prune aggressively to keep the canopy open. Monitor for pests (like codling moths), as trellises can make spotting them easier.
My trellis keeps bending—what’s going wrong?
Bending often signals insufficient support. Check these fixes:
- Stake depth: Posts should be buried at least 2 ft deep or anchored with concrete.
- Material strength: Use 1.5–2 inch diameter posts for mature trees.
- Tree weight: Add horizontal cables or cross-braces to distribute stress.
Wrapping up and next steps
Transforming your orchard or backyard with an apple tree trellis system isn’t just about saving space—it’s about unlocking healthier, happier fruit trees and a more manageable harvest! 🌳 Whether you’re working with dwarf varieties or training mature canopies, the right trellis setup ensures better airflow, sunlight exposure, and easier maintenance.
The key is choosing materials that match your climate, tree type, and long-term goals.
Ready to take the next step? Start small—test a single trellis with one of your trees, monitor its growth, and adjust as needed. Before you know it, you’ll be enjoying bountiful, well-supported apple trees while making the most of your garden’s real estate. Happy growing! 🍏✨